


Results 1 to 1 of 1
-
1st Mar 2014, 10:02 AM#1


 OPRespected Member

 How to configure an email account in Thunderbird
Now let's learn how to setup that new email account in Thunderbird, so you'll be able to send/receive emails to/from that new email account from here.
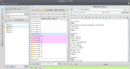
1) Start by clicking the Tools link here. Then click Account Settings.

2) The Account Settings window appears. Scroll down.

3) Click the Add Account button.

4) The Account Wizard windows opens. Make sure the Email account option is selected, then click Next.

5) Enter Your Name as you would like it to appear in the From field of outgoing emails.

6) Then enter your new email address here. Click Next.

Now you have to enter your Incoming Server (POP) setting, which would have been provided to you in your welcome email. Typically, the Incoming Server (POP) setting is simply mail.yourdomain.com, where 'yourdomain.com' is to be replaced with your own domain name.
7) Choose POP3 for the incoming mail server setting.

8) Now enter your Incoming Server (POP) setting here. Then click Next.

9) Now enter the email username as provided to you by your hosting provider..... this may be the entire email address (john@demo1234.com), or just the username prefix (john).

10) Enter your username again here..... your outgoing username is typically the same as your incoming username..... unless you're using a different SMTP server. Click Next.

11) Enter a Name for this new account.

12) Then click Next.

13) Click Finish to complete the wizard.

14) Scroll up.

We're almost finished! But first let's go finish configuring our SMTP outgoing mail server.
15) Click the Outgoing Server (SMTP) link here.

16) Click the Default SMTP server here.....

17) ..... then click Edit.

18) Enter your Outgoing (SMTP) server setting in this box here..... it should have been provided to you in your welcome email.

19) Make sure the SMTP Authentication box is checked. Click OK when finished.

SMTP authentication means that Thunderbird will login to your mail server even when sending emails (not just receiving), ensuring that you are the only one that can send emails from your account. Most SMTP servers use the same username and password as the incoming (POP3) servers.
That's it! We've successfully setup an email account, and can now start sending and receiving emails to and from that account, from Thunderbird.
This is the end of the tutorial. You now know how to setup an email account in Thunderbird. Remember that you also have to create that email address in your hosting account before it will work.Areon Reviewed by Areon on . How to configure an email account in Thunderbird Now let's learn how to setup that new email account in Thunderbird, so you'll be able to send/receive emails to/from that new email account from here. 1) Start by clicking the Tools link here. Then click Account Settings. http://www.besthostingforums.com/images/cdn/besthostingforums.com/2014/03/frame03_1-16.png 2) The Account Settings window appears. Scroll down. http://www.besthostingforums.com/images/cdn/besthostingforums.com/2014/03/frame04_1-14.png 3) Click the Add Account button. Rating: 5

 Register To Reply
Sponsored Links
Thread Information
Users Browsing this Thread
There are currently 1 users browsing this thread. (0 members and 1 guests)
Similar Threads
-
How to configure an email account in Pegasus
By Areon in forum Server ManagementReplies: 0Last Post: 1st Mar 2014, 10:00 AM -
How to configure an email account in Opera
By Areon in forum Server ManagementReplies: 0Last Post: 1st Mar 2014, 09:55 AM -
How to configure an email account in Netscape
By Areon in forum Server ManagementReplies: 0Last Post: 1st Mar 2014, 09:54 AM -
How to configure an email account in IncrediMail
By Areon in forum Server ManagementReplies: 0Last Post: 1st Mar 2014, 09:53 AM -
How to configure an email account in FoxMail
By Areon in forum Server ManagementReplies: 0Last Post: 1st Mar 2014, 09:52 AM


 Staff Online
themaCreator - create posts from...
Version 3.17 released. Open older version (or...